Installation
Note
The library has been tested against Python 2.7 and 3.4+.
For Python3 installation, substitute the following in the instructions below.
pip⇒pip3,python⇒python3,python-dev⇒python3-dev,python-pip⇒python3-pip.
Pre-requisites
MAX7219 Devices
By default, the SPI kernel driver is NOT enabled on the Raspberry Pi Raspian image. You can confirm whether it is enabled using the shell commands below:
$ lsmod | grep -i spi
spi_bcm2835             7424  0
Depending on the hardware/kernel version, this may report spi_bcm2807 rather than spi_bcm2835 - either should be adequate.
And that the devices are successfully installed in /dev:
$ ls -l /dev/spi*
crw------- 1 root root 153, 0 Jan  1  1970 /dev/spidev0.0
crw------- 1 root root 153, 1 Jan  1  1970 /dev/spidev0.1
If you have no /dev/spi files and nothing is showing using lsmod then this
implies the kernel SPI driver is not loaded. Enable the SPI as follows (steps
taken from https://learn.sparkfun.com/tutorials/raspberry-pi-spi-and-i2c-tutorial#spi-on-pi):
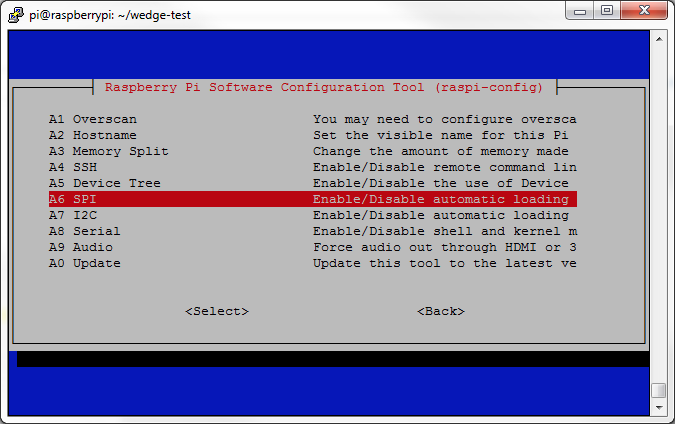
- Run
sudo raspi-config - Use the down arrow to select
9 Advanced Options - Arrow down to
A6 SPI. - Select yes when it asks you to enable SPI,
- Also select yes when it asks about automatically loading the kernel module.
- Use the right arrow to select the <Finish> button.
- Select yes when it asks to reboot.
After rebooting re-check that the lsmod | grep -i spi command shows whether
SPI driver is loaded before proceeding. If you are stil experiencing problems, refer to the official
Raspberry Pi SPI troubleshooting guide
for further details, or ask a new question - but
please remember to add as much detail as possible.
GPIO pin-outs
MAX7219 Devices (SPI)
The breakout board has two headers to allow daisy-chaining:
| Board Pin | Name | Remarks | RPi Pin | RPi Function |
| 1 | VCC | +5V Power | 2 | 5V0 |
| 2 | GND | Ground | 6 | GND |
| 3 | DIN | Data In | 19 | GPIO 10 (MOSI) |
| 4 | CS | Chip Select | 24 | GPIO 8 (SPI CE0) |
| 5 | CLK | Clock | 23 | GPIO 11 (SPI CLK) |
See also
See notes section for cascading/daisy-chaining, power supply and level-shifting.
WS2812 NeoPixels (DMA)
Typically, WS2812 NeoPixels reqire VCC, VSS (GND) and DI pins connecting to the Raspberry Pi, where the DI pin is usually connected to a PWM control pin such as GPIO 18.
| Board Pin | Name | Remarks | RPi Pin | RPi Function |
| 1 | DO | Data Out | ||
| 2 | DI | Data In | 12 | GPIO 18 (PWM0) |
| 3 | VCC | +5V Power | 2 | 5V0 |
| 4 | NC | Not connected | ||
| 5 | VDD | Not connected | ||
| 6 | VSS | Ground | 6 | GND |
The DO pin should be connected to the DI pin on the next (daisy-chained) neopixel, while the VCC and VSS are supplied in-parallel to all LED’s. WS2812b devices now are becoming more prevalent, and only have 4 pins.
Installing from PyPi
Install the dependencies for library first with:
$ sudo usermod -a -G spi,gpio pi
$ sudo apt-get install python-dev python-pip libfreetype6-dev libjpeg-dev
$ sudo -i pip install --upgrade pip setuptools
$ sudo apt-get purge python-pip
Warning
The default pip bundled with apt on Raspbian is really old, and can cause components to not be installed properly. Please ensure that pip 9.0.1 or newer is installed prior to continuing:
$ pip --version
pip 9.0.1 from /usr/local/lib/python2.7/dist-packages (python 2.7)
Proceed to install latest version of the library directly from PyPI:
$ sudo -H pip install --upgrade luma.led_matrix
Examples
Ensure you have followed the installation instructions above. Clone the repo from github, and run the example code as follows:
$ python examples/matrix_demo.py
The matrix demo accepts optional flags to configure the number of cascaded devices and correct the block orientation phase shift when using 4x8x8 matrices:
$ python examples/matrix_demo.py -h
usage: matrix_demo.py [-h] [--cascaded CASCADED]
                      [--block-orientation {0, 90, -90}]

matrix_demo arguments

optional arguments:
-h, --help            show this help message and exit
--cascaded CASCADED, -n CASCADED
                      Number of cascaded MAX7219 LED matrices (default: 1)
--block-orientation {0, 90, -90}
                      Corrects block orientation when wired vertically
                      (default: 0)
Similarly, there is a basic demo of the capabilities of the
luma.led_matrix.virtual.sevensegment wrapper:
$ python examples/sevensegment_demo.py
and for the luma.led_matrix.device.neopixel device:
$ sudo python examples/neopixel_demo.py
Further examples are available in the luma.examples. git repository. Follow the instructions in the README for more details.
A small example application using ZeroSeg to display TOTP secrets can be found in https://github.com/rm-hull/zaup.